「簡単なアプリから試してみたいけど、どこから手をつければいいのか分からない…」
そんな方にぴったりなプロジェクトがこちら!
今回は、AI「Windsurf」にお願いして、シンプルなカウンターアプリを作ってもらいました。
→完成したアプリはこちら。
HTML・CSS・JavaScriptの3つだけで構成されたこのアプリ、見た目も機能もスッキリしていて、プログラミング初心者の練習にも最適です。
この記事では、完成したアプリの紹介からプロンプト、コードの解説まで、まるっとお届けします!
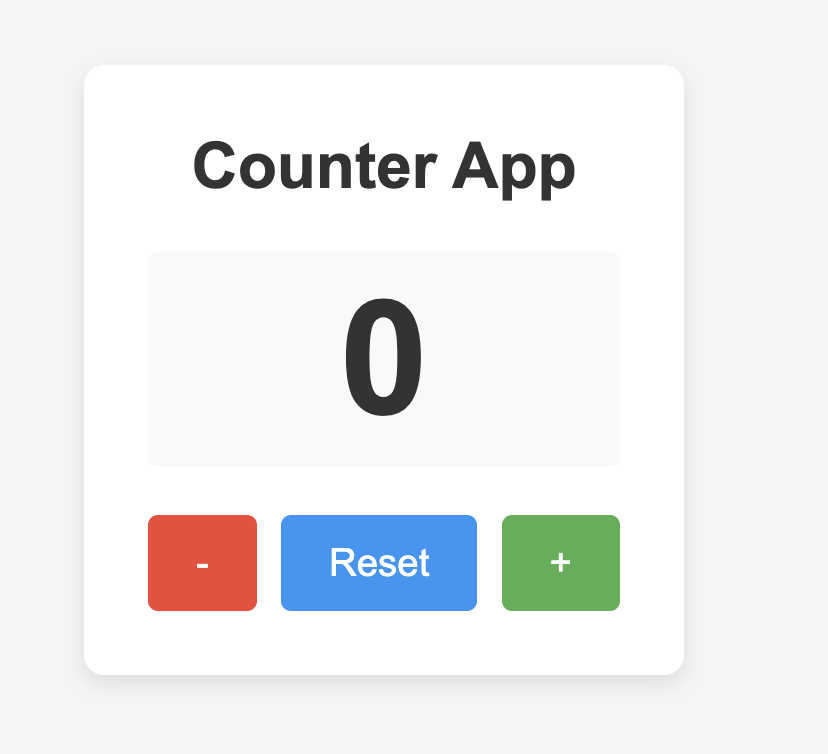
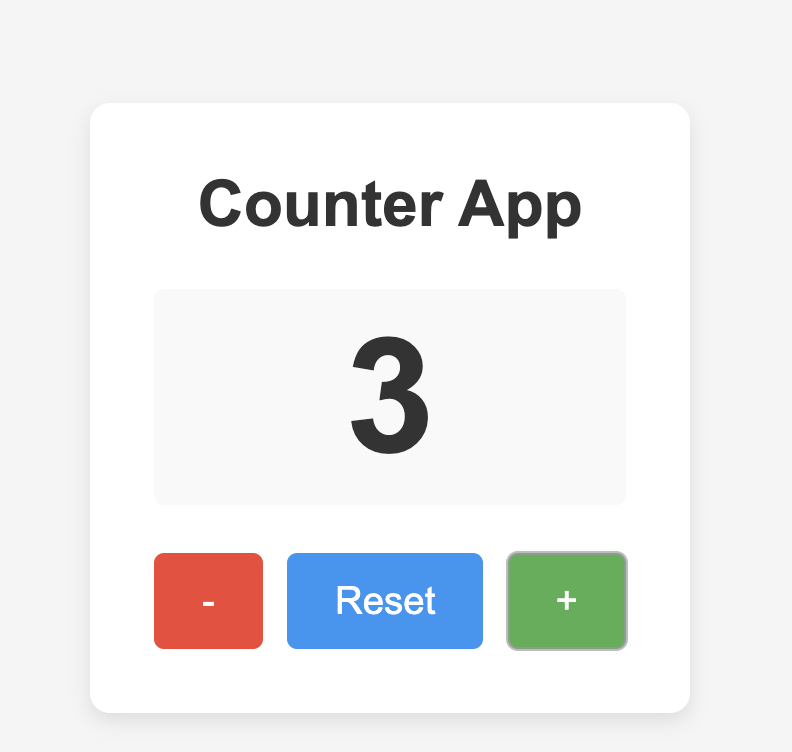
ミニマルで実用的なカウンターアプリ
今回のカウンターアプリは、以下の3つのファイルで構成されています。
index.html:アプリの骨組み(表示部分)styles.css:デザイン(見た目の装飾)script.js:動きやデータ処理の部分
主な機能は、以下のとおりです。
- カウントの表示
- 「+」「-」ボタンで数値の増減
- 「Reset」ボタンで0にリセット
- ブラウザのローカルストレージに保存(リロードしてもカウント値が残る)
何かを数える場面(イベントの来場者数、作業回数、筋トレ回数など)で使えるシンプルなアプリです。
使用プロンプトの紹介
今回、Windsurfに投げたプロンプトはこんな感じです👇
Create a simple counter app using HTML, CSS, and JavaScript.

Features:
- A number display showing the current count
- "Increment" button to increase the count
- "Decrement" button to decrease the count
- "Reset" button to reset the count to zero
- Use localStorage to persist the count value
- Style it cleanly with CSS
たったこれだけで、3ファイルに分かれたしっかり動くアプリをまるっと出力してくれました。
いや〜便利すぎます。
コードの中身紹介:それぞれの役割とポイント
index.html:見た目の構造を定義
<!DOCTYPE html>
<html lang="en">
<head>
    <meta charset="UTF-8">
    <meta name="viewport" content="width=device-width, initial-scale=1.0">
    <title>Counter App</title>
    <link rel="stylesheet" href="styles.css">
</head>
<body>
    <div class="container">
        <h1>Counter App</h1>
        <div class="counter-display">
            <span id="count">0</span>
        </div>
        <div class="buttons">
            <button id="decrement">-</button>
            <button id="reset">Reset</button>
            <button id="increment">+</button>
        </div>
    </div>
    <script src="script.js"></script>
</body>
</html>
数字の表示エリアと、3つのボタンがシンプルに構成されています。HTMLタグもセマンティックで、読みやすさも◎。
<div class="counter-display">
    <span id="count">0</span>
</div>
styles.css:清潔感のあるデザイン
* {
    margin: 0;
    padding: 0;
    box-sizing: border-box;
    font-family: 'Arial', sans-serif;
}

body {
    display: flex;
    justify-content: center;
    align-items: center;
    min-height: 100vh;
    background-color: #f5f5f5;
}

.container {
    background-color: white;
    padding: 2rem;
    border-radius: 10px;
    box-shadow: 0 4px 10px rgba(0, 0, 0, 0.1);
    text-align: center;
    width: 300px;
}

h1 {
    margin-bottom: 1.5rem;
    color: #333;
}

.counter-display {
    font-size: 5rem;
    font-weight: bold;
    color: #333;
    margin: 1rem 0;
    padding: 0.5rem;
    border-radius: 5px;
    background-color: #f9f9f9;
}

.buttons {
    display: flex;
    justify-content: space-between;
    margin-top: 1.5rem;
}

button {
    padding: 0.8rem 1.5rem;
    font-size: 1.2rem;
    border: none;
    border-radius: 5px;
    cursor: pointer;
    transition: background-color 0.3s, transform 0.1s;
}

button:active {
    transform: scale(0.95);
}

#increment {
    background-color: #4caf50;
    color: white;
}

#decrement {
    background-color: #f44336;
    color: white;
}

#reset {
    background-color: #2196f3;
    color: white;
}

button:hover {
    opacity: 0.9;
}
文字サイズを大きく、ボタンもカラフルに設定されています。
ボタンにはそれぞれ「緑=+」「赤=−」「青=リセット」という色が割り当てられていて、視覚的にも分かりやすいです。
.counter-display {
    font-size: 5rem;
    font-weight: bold;
    background-color: #f9f9f9;
}
script.js:ロジックはたったこれだけ!
document.addEventListener('DOMContentLoaded', () => {
    // DOM elements
    const countDisplay = document.getElementById('count');
    const incrementBtn = document.getElementById('increment');
    const decrementBtn = document.getElementById('decrement');
    const resetBtn = document.getElementById('reset');

    // Initialize count from localStorage or default to 0
    let count = parseInt(localStorage.getItem('count')) || 0;

    // Update the display with the current count
    function updateDisplay() {
        countDisplay.textContent = count;
        // Save to localStorage
        localStorage.setItem('count', count);
    }

    // Initialize display
    updateDisplay();

    // Event listeners
    incrementBtn.addEventListener('click', () => {
        count++;
        updateDisplay();
    });

    decrementBtn.addEventListener('click', () => {
        count--;
        updateDisplay();
    });

    resetBtn.addEventListener('click', () => {
        count = 0;
        updateDisplay();
    });
});
ここでローカルストレージから過去のカウント値を取得し、なければ0からスタートします。更新のたびに値を保存しているので、ブラウザを閉じてもカウントが保持されます。
let count = parseInt(localStorage.getItem('count')) || 0;ボタン処理も非常にシンプルです👇
incrementBtn.addEventListener('click', () => {
    count++;
    updateDisplay();
});
JavaScript初心者でも、少し勉強すればすぐ理解できる内容です。自分でアレンジしたり、ボタンの追加なども簡単にできます。
まとめ:小さなアプリからはじめる、AI×開発の第一歩
このカウンターアプリ、シンプルながら実用的で、「小さく作る」「とりあえず動かす」にはうってつけです。
WindsurfのようなAIを使えば、ゼロからコードを書くハードルがグッと下がります。むしろ「AIに土台を作ってもらって、そこからちょっとずつ自分好みに育てていく」くらいの方が、楽しく学べます。
次は「ステップ数を記録する万歩計風アプリ」とか、「押した回数でポイントが貯まるアプリ」なんて応用もできそうですね!
ぜひ、あなたもWindsurfで、初めての「動くアプリ」体験してみてください。